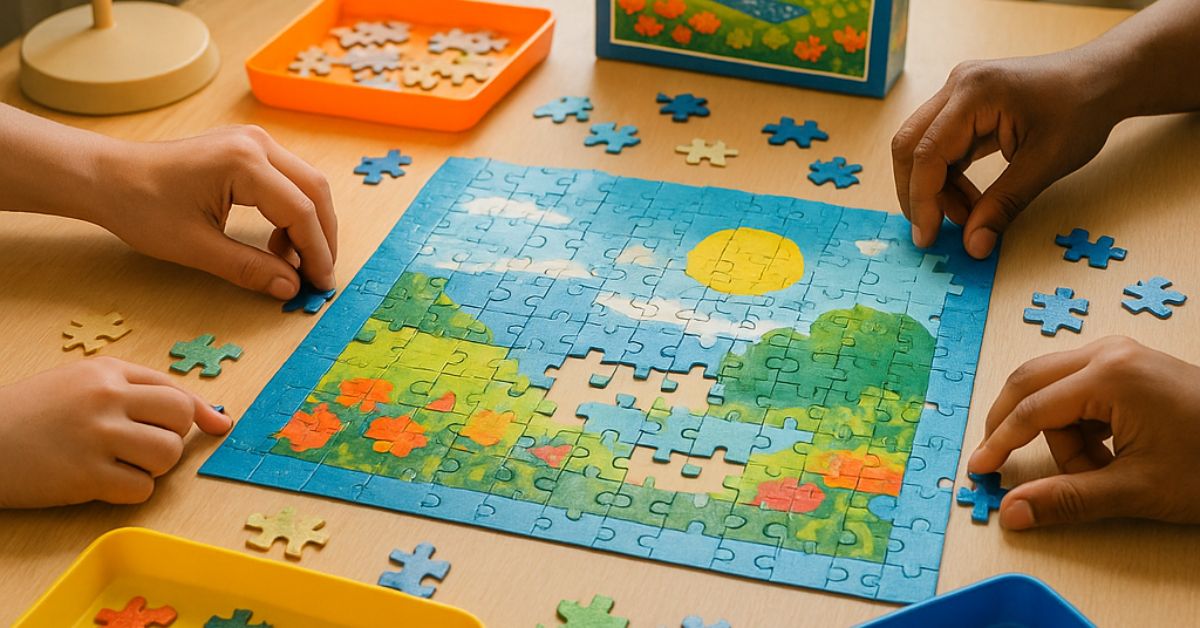
Have you ever looked at a jigsaw puzzle and wondered where to start? A jigsaw puzzle is a fun game made up of many small pieces that fit together to form a complete picture. Each piece has its own unique shape, and your goal is to figure out where every piece belongs.
Many people enjoy putting puzzles together because it’s relaxing, fun, and a great way to exercise your brain. Solving a puzzle can help you focus, improve your memory, and give you a real sense of achievement when you finish. Puzzles are also a wonderful activity to enjoy with family and friends—everyone can join in and work together.
In this article, you’ll learn a simple, step-by-step method for assembling a jigsaw puzzle. Whether you’re brand new to puzzles or just want to get better at solving them, you’ll find clear instructions and helpful tips to make your puzzle experience enjoyable and rewarding. Let’s get started!
1. Choosing the Right Puzzle
Before you begin your puzzle adventure, it’s important to pick the right puzzle for you. Jigsaw puzzles come in many types, sizes, and designs. Choosing the right one will help make your experience fun and not too frustrating.
Types of Puzzles
You’ll notice that puzzles come in different piece counts, such as 100, 300, 500, or even 1,000 pieces or more. The more pieces a puzzle has, the more challenging it will be. If you’re new to puzzles or want a quick, easy win, try starting with a smaller puzzle, like 100 or 300 pieces. If you’re ready for more of a challenge, you can try puzzles with 500 or 1,000 pieces.
Puzzles also have different pictures on them. Some have simple, colorful images, while others might show detailed landscapes, famous artworks, or scenes with lots of tiny, similar-looking areas. Puzzles with lots of colors and clear patterns are usually easier, while those with large areas of the same color (like a blue sky) are harder.
How to Pick the Right Puzzle for Your Skill Level
Think about your own experience with puzzles. If you’re a beginner, choose a puzzle with fewer pieces and a picture that’s easy to recognize. Look for puzzles labeled for your age group or skill level—some boxes say “Beginner,” “Family,” or “Advanced.” As you get better, you can try bigger puzzles with more complicated images.
If you’re doing the puzzle with kids or family members, make sure the puzzle is age-appropriate. Younger children usually do best with larger pieces and simpler pictures. Adults and older kids can handle smaller pieces and more complex designs.
Importance of a Comfortable Workspace
Once you have your puzzle, you’ll need a good place to work on it. Find a flat surface like a table or desk that’s big enough to hold all the pieces and the finished puzzle. Good lighting helps you see the colors and shapes more clearly. It’s also nice to have a chair you can sit in comfortably, since you might be working on your puzzle for a while.
If you need to use the table for something else later, you can get a puzzle mat or board that lets you move your puzzle without breaking it apart.
Choosing the right puzzle and setting up your workspace will make the whole experience smoother and much more enjoyable. Now you’re ready to get started!
2. Preparing to Start
Before you pour out all the pieces and start puzzling, it’s helpful to get everything ready. Preparing your workspace and materials will make the process smoother and more enjoyable.
Clearing and Preparing Your Workspace
First, choose a flat surface like a table, desk, or puzzle board. Make sure it’s big enough for all the pieces and for the finished puzzle. Clear away anything you don’t need so you have plenty of room to spread out the pieces. Good lighting is important too—bright light helps you see colors and details, making it easier to match pieces together. If possible, sit somewhere comfortable so you can enjoy puzzling for as long as you want.
What Materials You Might Need
Having the right materials can make assembling your puzzle much easier. Here are some helpful items:
- Sorting trays or bowls: These help you organize the pieces by color, shape, or edge.
- Puzzle mat or board: If you need to move your puzzle or put it away, a mat lets you roll up the puzzle safely.
- Containers or small boxes: These are great for separating different types of pieces.
- Reference image: Keep the box or a copy of the puzzle picture nearby, so you can look at it while you work.
You don’t need to buy anything fancy—small kitchen bowls, food containers, or even paper plates can work for sorting pieces!
Opening the Box
When you’re ready, open the box and gently pour out all the pieces onto your workspace. Make sure to check the box to see if any pieces are still inside. Sometimes, puzzles come with a small poster of the image—if yours does, keep it handy. If not, you can use the picture on the lid as a guide.
Take a moment to look at the image on the box or poster. This will help you get familiar with the shapes, colors, and areas of the puzzle. It’s also a good idea to keep the box or lid with the image close by throughout the whole process.
Now that your workspace is set up and you have everything you need, you’re ready to start sorting and building your puzzle!
3. Sorting the Pieces
Before you start putting the puzzle together, it’s a good idea to sort your pieces. Sorting helps you find the pieces you need more quickly and keeps everything organized, so you don’t feel overwhelmed by a big pile of random shapes.
Why Sorting Is Helpful
When you sort your pieces, you make it easier to see patterns, colors, and shapes. It saves you time later and makes the puzzle much less confusing. Many people find that sorting is the secret to finishing a puzzle faster and having more fun along the way.
Sorting by Edge vs. Middle Pieces
Start by turning all the pieces picture-side up. Then, look for the edge and corner pieces. Edge pieces have at least one straight side, while corner pieces have two straight sides. Put these into a separate pile. The rest of the pieces, which have no straight edges, are the middle pieces—put these in another pile.
Building the puzzle border first is one of the easiest ways to get started, so sorting out the edges now will help you later.
Sorting by Color, Pattern, or Shape
Next, look at your pieces and see if you can group them by color or pattern. For example, all the blue pieces might go together if there’s a sky in the puzzle. Pieces with stripes, dots, or other special features can go in their own piles too. Some people also sort by shape—pieces with two “knobs” and two “holes,” for example, can be grouped together.
You don’t have to sort every single piece, but making a few simple groups can make it easier to find what you need as you build.
Tips for Handling Lost or Extra Pieces
Sometimes, a piece may fall on the floor or get stuck inside the box. If you can’t find a piece, check under the table, on the floor, or inside the puzzle box. It’s rare, but sometimes puzzles come with an extra piece or might be missing one. If you have an extra, set it aside until the end to see if it’s really extra or just seems out of place. If you notice a missing piece, don’t worry—keep going! Sometimes it will turn up later, or it might just be a puzzle quirk.
Sorting your pieces sets you up for a smooth and enjoyable puzzling experience. Now you’re ready to start building the puzzle!
4. Building the Puzzle Edge (The Border)
Now that you’ve sorted your pieces, it’s time to start building the puzzle. The best place to begin is with the edge—the border of the puzzle. This step gives you a solid frame to work inside and makes the rest of the puzzle much easier.
Finding All the Edge and Corner Pieces
Look through your sorted pieces and gather all the ones with at least one straight edge. Four of these pieces will have two straight sides—these are the corners. Place the corner pieces to the side for now, and keep the rest of the edge pieces together in another pile.
Building the Border First: Why It Helps
Starting with the border is helpful because it gives your puzzle a clear shape and size. Once you finish the border, you’ll know exactly where the inside pieces should go. This frame helps you organize your work and makes it easier to fill in the middle sections later.
How to Connect the Border (Corners First, Then Straight Edges)
Begin by placing the four corner pieces in their correct positions. Usually, you can match them to the image on the box, finding the top-left, top-right, bottom-left, and bottom-right corners.
Next, start connecting the straight edge pieces between the corners. Try matching colors and patterns from the puzzle image. Look for pieces that have similar colors or lines on their edges. Gently test the fit—if a piece doesn’t fit easily, it probably doesn’t go there.
Work your way around the border until you’ve completed the entire frame. Now you have a strong outline to guide you as you move on to the rest of the puzzle!
Building the border first makes everything that comes next much easier and more enjoyable. You’re off to a great start!
5. Sorting and Grouping Interior Pieces
With your puzzle border complete, it’s time to start working on the pieces that fit inside. This part can seem a little tricky, but sorting and grouping your interior pieces will make everything much simpler.
Grouping by Colors, Patterns, or Identifiable Features
Look closely at your remaining pieces. Try to sort them into groups based on their colors, patterns, or anything that stands out. For example, if your puzzle has a section with blue sky, put all the blue pieces together. If there are areas with flowers, faces, or bold lines, make small piles for those as well.
Grouping pieces this way helps you focus on one section at a time, instead of searching through all the pieces for every part of the puzzle.
Using the Box Image for Reference
Keep the puzzle box or poster with the finished picture nearby. Look at it often as you sort your pieces. Notice where different colors and shapes appear in the picture. This will help you decide which group each piece belongs to and where they might fit later.
If you find a piece with a special detail—like a window, an animal’s eye, or a word—check the image on the box to see exactly where it goes.
Setting Aside Small, Unique Pieces
Some pieces have very unique shapes or details that don’t match the other pieces right away. If you notice pieces with special patterns, words, or shapes, set them aside in a separate pile. These pieces can be helpful “clues” when you get stuck later, and they often fit into the puzzle in just one spot.
Taking the time to sort and group your interior pieces makes building the puzzle easier and much more fun. You’ll spend less time searching and more time finding the right fits!
6. Assembling Small Sections
Now that your pieces are sorted into groups, it’s time to start building! The best way to fill in the puzzle is to focus on one area at a time, especially the parts of the picture that stand out.
Working on Distinct Areas (Sky, Trees, Buildings, Faces, Text, etc.)
Look at the picture on your box and choose a part that’s easy to recognize, like the sky, a tree, a building, a face, or any clear shape or color. Take all the pieces from your sorted group for that section and try to fit them together. It’s easier to start with areas that have strong colors or patterns, as the pieces usually look different from the rest of the puzzle.
Connecting Small Groups of Pieces Before Adding to the Main Puzzle
When you find pieces that fit together, join them to form small groups or “mini sections.” Don’t worry if they don’t fit into the main puzzle yet—just keep working with the pieces that match each other. You might build a small section of the blue sky, a part of a tree, or some letters from a sign.
Moving Groups Into the Main Frame
As your small groups get bigger, try to see where they fit within the puzzle border you built earlier. Use the box image to help you figure out where each section belongs. When you find the right spot, gently move your group of connected pieces into the main frame and see if they connect with the border or other completed sections.
Keep building more small sections and moving them into place. Bit by bit, your puzzle will come together! Working on small sections is a great way to make steady progress and stay motivated as you go.
7. Filling in the Puzzle
You’ve already built the border and started some small sections. Now it’s time to fill in the rest of your puzzle by connecting everything together.
Connecting Sections to the Border and to Each Other
As you complete more small groups of pieces, try to fit them into the puzzle border. Use the box image to guide you. When a group fits perfectly inside the frame, you know you’re on the right track! Also, look for ways to connect your small sections to each other. Sometimes, two small groups you made earlier will fit together and become one larger part of the puzzle.
Working from Easiest to Hardest Sections
It’s helpful to work on the easiest parts first. These are usually sections with clear patterns, bright colors, or special shapes. As you fill in more of the puzzle, you’ll have fewer pieces to choose from, making the harder areas easier to complete. Save the tricky parts, like large areas of the same color (such as the sky or water), for last if you can. By then, you’ll have more clues from the surrounding pieces.
Staying Patient and Taking Breaks
Sometimes you might get stuck or feel frustrated if a piece doesn’t seem to fit. That’s normal! Stay patient, and don’t be afraid to take short breaks. When you come back with fresh eyes, you might spot the right piece more quickly. Enjoy the process and remember that putting together a puzzle takes time.
Filling in the puzzle step by step is both challenging and rewarding. With patience and careful work, you’ll see the whole picture come together!
8. Troubleshooting and Sticking Points
Even the best puzzlers sometimes get stuck! Don’t worry—there are simple ways to solve common problems when working on your puzzle.
What to Do if a Piece Doesn’t Fit
If you find a piece that almost fits but doesn’t go in smoothly, don’t force it. Forcing a piece can bend or damage it, and it usually means the piece belongs somewhere else. Just set it aside and try a different piece. Every puzzle piece is made to fit in one special place, and it will go in easily when you find the right spot.
Tips for Finding Stubborn Pieces
Sometimes, you might be searching for one piece for a long time. If this happens, try these tips:
- Re-sort your pieces: Go through your pieces again and make sure they’re grouped by color, shape, or pattern. Sometimes a missing piece is hiding in the wrong pile.
- Double-check your piles: Look carefully at each pile or tray. A piece can easily flip over or get stuck under others.
- Use good lighting: Make sure your workspace is well-lit so you can see the details and colors clearly. Bright light can help you spot the piece you need.
How to Handle Missing Pieces
If you can’t find a piece, check the floor and under your table—it’s easy for pieces to fall or slide away. Also, look inside the puzzle box, under the lid, or in nearby containers.
If you think a piece is missing, don’t panic. Sometimes it shows up later! Finish the rest of the puzzle first. If a piece truly is lost, some puzzle companies can send you a replacement if you ask.
Remember, getting stuck is normal. Stay patient, keep looking, and soon you’ll be puzzling again!
9. Finishing the Puzzle
You’re almost done! Placing the last pieces of your jigsaw puzzle is a great feeling and a big accomplishment.
Placing the Last Pieces
As you reach the end, you’ll notice there are only a few pieces left. This part usually goes quickly because you have fewer spots to fill and fewer pieces to try. Carefully place each of the last pieces in its correct spot. Enjoy the moment as you see the whole picture finally come together!
Checking for Any Missed Pieces or Errors
Before you celebrate, take a minute to look over your puzzle. Make sure all the pieces are pressed down and nothing is out of place. If you spot a piece that doesn’t look quite right, try swapping it with a nearby piece to see if it fits better. Sometimes, a missing piece turns up right at the end—check around your workspace just in case.
Taking a Moment to Enjoy Your Finished Puzzle
Now, step back and look at your completed puzzle! You worked hard and stayed patient, and now you can see the full, beautiful picture you created. Take a photo to remember your work, or show your friends and family. Give yourself a moment to feel proud before you decide what to do next.
Finishing a puzzle is a wonderful accomplishment. Enjoy it!
10. What to Do Next
You’ve finished your puzzle—now what? There are a few fun and useful things you can do after your puzzle is complete.
How to Store or Frame Your Completed Puzzle
If you want to save your puzzle, you have a few options. You can carefully take it apart and put the pieces back in the box for another day. If you’re really proud of your puzzle, you can glue it together and put it in a frame. Puzzle glue is easy to use—just spread it over the surface, let it dry, and then place your puzzle in a frame to hang on the wall. This way, you can enjoy your hard work every day!
Taking Photos or Sharing With Friends and Family
Take a photo of your finished puzzle before you take it apart or frame it. You can keep it as a memory or share it with friends and family. Show them what you created—they might want to join you for your next puzzle!
Starting Your Next Puzzle (Ideas for Increasing the Challenge)
Once you’ve finished one puzzle, you might be excited to try another. You can pick a bigger puzzle with more pieces, or choose a picture with more details or similar colors to make it a little harder. Some people like to time themselves or work on puzzles with friends for extra fun. Every puzzle is a new challenge and a new adventure!
Whatever you choose, enjoy your success and look forward to your next puzzle experience!
11. Extra Tips and Common Mistakes
Even if you’re careful, it’s easy to make mistakes while working on a puzzle. Here are some simple tips to help you avoid common problems and make your puzzling time even better.
Don’t Force Pieces That Don’t Fit
If a piece doesn’t fit easily, don’t push it in. Forcing pieces can bend or damage them, and it usually means the piece goes somewhere else. Each puzzle piece is made to fit in just one spot, so be patient and keep looking for the right place.
Keep Food and Drinks Away From the Puzzle Area
It’s best not to eat or drink near your puzzle. Food and drinks can spill and damage the pieces or make them sticky. If you need a snack or a drink, take a short break and enjoy it away from your puzzle area.
Work in Good Light and Take Care of Your Eyes
Good lighting helps you see the shapes and colors better. Try to work in a bright room or use a lamp. If you feel your eyes getting tired, take a short break. This will help you stay comfortable and enjoy puzzling for longer.
Keep Pets and Small Children Away While Working
Pets and small children might accidentally move or lose pieces, or even chew on them! If you can, puzzle in a place where pets and little kids can’t reach your workspace. This will help you keep all your pieces safe and in one place.
By following these simple tips, you’ll have a much smoother and more enjoyable puzzle experience!
Conclusion
Finishing a jigsaw puzzle is a wonderful feeling. You took many small pieces and turned them into a beautiful picture, using your focus, patience, and problem-solving skills. It’s fun, relaxing, and gives you a real sense of satisfaction when you place that last piece.
As you get better at puzzles, don’t be afraid to try bigger ones or choose more challenging pictures. Each new puzzle is a chance to learn and have even more fun. Remember, every puzzle you finish helps you improve your skills for the next one.
Finally, share your puzzle stories and photos with friends and family. You might inspire someone else to start puzzling too! No matter your age or experience, jigsaw puzzles are a great way to spend your time and enjoy a rewarding challenge. Happy puzzling!
Frequently Asked Questions (FAQ)
What if a piece is missing?
If you can’t find a piece, don’t worry. Check the floor, under the table, or inside the box. Sometimes a piece can get stuck in a strange spot. If it’s truly lost, finish the puzzle anyway—many puzzle companies can send a replacement if you contact them. Sometimes, the piece will turn up later!
How long should a puzzle take to finish?
There’s no set time for finishing a puzzle. It depends on the number of pieces, how tricky the picture is, and how much time you spend each day. Some people finish a small puzzle in one evening, while bigger puzzles can take days or even weeks. Go at your own pace and enjoy the process!
What’s the best way to store an unfinished puzzle?
If you need to stop and come back later, try using a puzzle mat or a large board so you can move your puzzle easily. You can also use trays or small boxes to keep sorted pieces safe. If you need to clear the table, gently slide your puzzle onto a big piece of cardboard and keep all the loose pieces in a box or bag.
Are there tricks for very large or very small pieces?
For puzzles with very large pieces, group similar colors and look for clear patterns. For puzzles with very small pieces, good lighting and sorting trays really help. Take your time, work in small sections, and don’t rush—every piece will fit somewhere!
If you have any more questions about puzzles, don’t hesitate to ask friends or look for helpful tips online. Happy puzzling!